Composition and Framing
Framing and composition are not the same. Framing is everything you decide to include or exclude from the image. Composition is how you organize these elements to guide the eye and tell a story.
⚙️ Framing vs Composition: Understanding the Difference
In short: with framing, you choose 'what to show' and remove the superfluous. With composition, you decide 'how to arrange' the selected elements to create a coherent visual relationship.
🖼️ Framing
Include/exclude elements
🎨 Composition
Visual relationships between elements
Framing = "what to show" • Composition = "how to arrange"
- Framing eliminates distractions and fills the frame with the subject.
- Composition establishes links between shapes, lines, colors, textures, and light.
🖼️ Effective Framing: 2 Simple Levers
To clean up your image and clarify the message, first play with your position, then with the angle of view or focal length.
👣 Move
Change position to eliminate distractions
📷 Adjust angle/focal
Vary framing from wide to tight
Position + Angle/Focal = Optimal framing
Move
- Left ⇄ right to remove a distracting element.
- Higher ⇅ lower (high/low angle) to simplify the background.
- Forward ⇄ backward to adjust the subject's size in the frame.
Adjust Angle or Focal Length
- Wide shot to set the context.
- Tight shot to isolate a detail and enhance emotion.
- A slight reframing often makes all the difference.
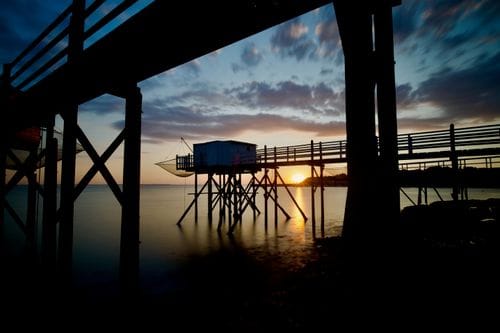
📖 Framing Changes the Story
The same place can look lively in a wide shot and mysterious in a tight shot on a look or texture. By choosing what you let into the image, you immediately influence the perceived meaning.
- Wide shot = context, atmosphere, scene dynamics.
- Tight shot = details, expressions, abstractions, and symbols.
Wide shot: set the scene and general mood.
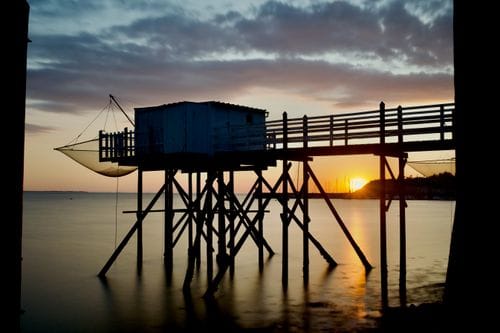
Tight shot: isolate a detail to enhance emotion.
📐 Varying Shot Types: Wide, Normal, Tight
For each photographic scene, remember to explore three different types of framing. This approach enriches your work and allows you to discover different ways of telling the same story.
Wide Shot
Normal Shot (or Medium)
Tight Shot
Wide Shot
The wide shot shows the environment as a whole. It places the subject in context and gives an overview of the scene.
- Includes maximum environmental elements
- Shows spatial relationships between elements
- Creates a sense of immersion and space
- Ideal for panoramic landscapes and atmospheric scenes
Normal Shot (or Medium)
The normal shot presents the subject in a balanced way, without too much context but without being too tight. It's often the most natural framing.
- Balance between subject and environment
- Vision close to what the human eye perceives
- Allows seeing the subject and part of its context
- Versatile for most situations
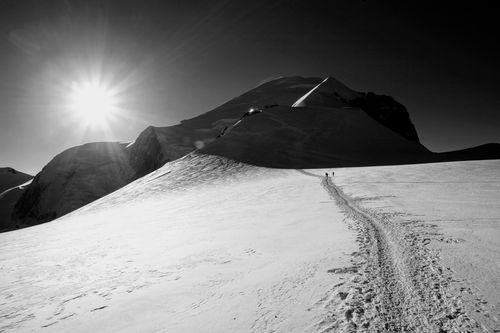
Tight Shot
The tight shot isolates a detail, texture, or specific part of the subject. It focuses attention and reveals aspects invisible in wide shots.
- Eliminates distractions and context
- Highlights details, textures and patterns
- Creates intimacy and emotional intensity
- Abstracts reality and reveals unexpected shapes
💡Practical tip: For every subject you photograph, systematically take these three types of shots. You'll often discover that your best image isn't the one you initially imagined. This discipline also develops your photographic eye.
🎯 Choosing a Main Subject
Before even thinking about the rule of thirds or leading lines, the first question to ask yourself is: what is the main subject of my photo? It's the element that should immediately catch the viewer's eye and carry the intention of your image.
1️⃣ Identify
2️⃣ Eliminate
3️⃣ Isolate
Process: identify the strongest subject → eliminate distractions → isolate to maximize impact
Identify the focal point
Ask yourself: what made me take out my camera? A particular light, an interesting shape, a striking contrast, an emotion? This focal point should be obvious in your composition.
Eliminate distractions
Once your subject is identified, eliminate everything that can divert attention: background objects, areas that are too bright or colorful that don't add to the story. Think minimalist: every element should have a reason to be in the frame.
Isolate the subject
Use depth of field (wide aperture), contrast (light/shadow), or negative space to make your subject stand out. A blurred background, a uniform sky, or a dark area can highlight your main element.
#️⃣ The Rule of Thirds
Divide your image into 9 equal zones and place important elements on the lines or intersections.
The main subject is positioned on a line intersection, creating a harmonious visual balance.
🛤️ Leading Lines
Use natural lines to guide the eye to your main subject.
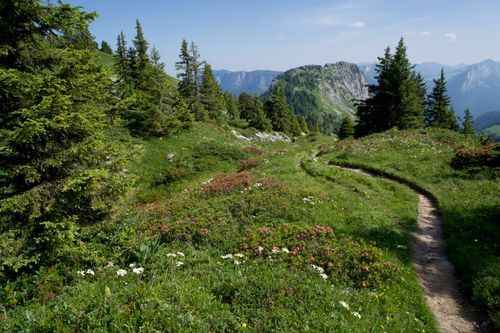
Rivers, paths, mountain ridges, rocky coasts, bridges
🧊 Creating Depth
Include elements at different distances: foreground, midground, background.
 ForegroundMidgroundBackground
Layer a striking foreground, a subject in the midground, and a background to create depth.
🪞 Symmetry and Reflections
Reflections in water or symmetrical compositions create powerful visual balance.
Reflections: a natural symmetry that stabilizes the composition and draws the eye.
🪟 Frame Within the Frame
Use openings, doors, windows, arches, shadows, or reflections to create a 'frame' within your image. This device focuses attention on the subject and adds depth and visual tension.
- Position yourself to align the subject with this natural frame.
- A frame can be flexible: silhouettes, light areas, repeated patterns.
- It doesn't have to be rectangular: think curves, diagonals, grids.
🧩 Watch the Edges of the Frame
We often focus on the center and forget the periphery. Before shooting, scan all four edges to spot a hand, pole, car, or cut-off element that disrupts the reading.
- Prefer a micro-move to remove the distracting element.
- Aim for the right framing when shooting, don't rely only on cropping.
🧮 Geometry and Repetition
Simple shapes powerfully structure an image. Spot rectangles, squares, circles, parallel lines, and patterns to create a visual frame that guides the eye to the subject.
- Echo between shapes (circle/glasses, rectangle/window, etc.).
- Repetitions and alignments create rhythm and coherence.
🔲 Patterns and Singularity
Repetitive patterns create a hypnotic visual rhythm, while a unique element breaking this pattern instantly draws the eye. Knowing how to play with these two concepts is a powerful compositional tool.
The Power of Repetition
Breaking the Pattern to Create a Focal Point
The Power of Repetition
Repeated patterns create order, rhythm, and visual harmony that soothes the eye. They can also generate interesting graphic tension.
- Windows on a building, vines in a field, waves on the ocean
- Repetition creates visual texture and depth
- Look for alignments, symmetries, series
- Both natural (scales, leaves) and artificial (architecture) patterns work
Breaking the Pattern to Create a Focal Point
A different element in the middle of a repetitive pattern automatically becomes the main point of interest. It's the exception that proves the rule.
- A lit window in a dark facade
- A person in red among a black and white crowd
- A lone tree in a row of poles
- A breaking wave different from the others
💡Composition tip: First look for repetitive patterns, then wait for a unique element to enter the frame (person, bird, car) or create it yourself (add an object, wait for the right light). This combination of repetition + singularity creates memorable images.
🎨 Complementary Colors
Complementary colors are opposite colors on the color wheel. When combined in a composition, they create vibrant contrast and naturally attract the eye. It's one of the most powerful tools for creating impactful images.
The Color Wheel
Complementary color pairs are located opposite each other on the color wheel. They reinforce each other and create dynamic visual tension.
- Blue and Orange (most common in landscape photography)
- Red and Green (nature, fruits, architecture)
- Yellow and Purple (lavender fields at sunset)
- Cyan and Red-orange (sea and rocks at golden hour)
In Photography
These combinations appear naturally in many scenes, especially during golden and blue hours.
- Blue sky and orange sand/rocks at sunrise/sunset
- Turquoise sea and red autumn vegetation
- Purple twilight sky and yellow artificial lights
- Green forest and red flowers/clothing
Visual Impact
Complementary colors create visual balance: each color brings out the intensity of the other. A small touch of complementary color is often enough to transform an ordinary image into a memorable one. However, avoid oversaturation: natural contrast is more elegant than artificial exaggeration.
💡Practical tip: During your photo outings, practice spotting complementary colors in your environment. Golden hour naturally offers the blue-orange combination. In post-processing, you can subtly enhance these contrasts to amplify visual impact without overdoing it.
🔗 Compose: Connect the Elements
Composition begins as soon as there are at least two elements in the frame. You can bring them closer by moving or waiting for the right moment, and play with the following visual relationships:
Leading Lines
Color Echo
Shape Repetition
Connecting Light
Different techniques to create visual connections between elements
- Contrasts of size, shapes, or textures.
- Complementary or harmonious colors.
- Parallel lines, responding curves, repeated patterns.
- Light that separates the subject from the background (light/dark).
🪜 Composing with 3 Elements (or More)
The more elements, the trickier the balance. Look for visual coherence and simplify without hesitation.
❌ Without clear hierarchy
✅ Visual hierarchy
A clear hierarchy guides the viewer's eye: main → secondary → background
- Clear hierarchy: main subject, secondary elements, background.
- Rhythm and repetition to structure the image.
- Remove anything that doesn't add to the reading.
⬜ Negative Space & Breathing Room
Negative space is the area around and between the main subject. Often overlooked, it is one of the most powerful tools for creating clean and impactful compositions. Emptiness is not an absence—it's an active element of composition.
❌ Without negative space
Saturated composition, confused gaze
✅ With negative space
Visual breathing, subject highlighted
What is negative space?
Negative space (or empty space) is the area of the image not occupied by the main subject. It can be a plain sky, a body of water, a wall, a blurred background, or any homogeneous surface. Unlike positive space (the subject), negative space doesn't directly attract attention, but it structures how the image is read.
Why use negative space?
- Subject isolation: emptiness highlights the subject by making it immediately identifiable
- Visual breathing: the eye needs rest areas to avoid being overwhelmed
- Elegance and minimalism: fewer elements = more impact
- Emotion and contemplation: emptiness creates a calm, meditative, sometimes melancholic atmosphere
- Eye direction: empty space naturally guides the eye toward the subject
Examples of negative space
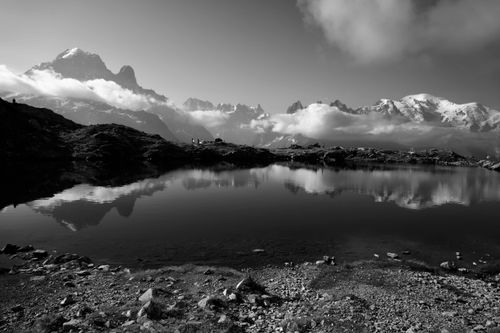
- A tiny mountaineer in the middle of a vast glacier
- A lone bird in a large blue sky
- An isolated tree in an expanse of snow
- An empty bench facing a white wall
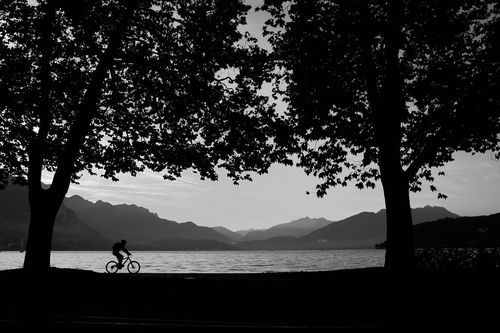
- A silhouette on a deserted beach at dusk
How to create negative space?
Simplify the scene
Eliminate everything non-essential. Look for plain backgrounds: clear skies, calm water surfaces, walls, snow, fog.
Position the subject intelligently
Place your subject in a corner or on one third of the image, leaving the remaining two-thirds empty. The void becomes as important as the subject.
Create contrast
A small dark subject on a light background (or vice versa) maximizes the impact of negative space. Tonal contrast reinforces separation.
Use depth of field
A wide aperture (f/1.8, f/2.8) can transform a cluttered background into blurred, homogeneous negative space.
Proportion rules
- • 70/30 rule: 70% negative space, 30% subject for strong minimalism
- • 80/20 rule: for even more radical and contemplative compositions
- • The perfect balance depends on your intent: isolation, solitude, grandeur, meditation
Mistakes to avoid
- Polluted negative space: a sky with power lines is not true empty space
- Subject too centered: the subject in the middle with emptiness everywhere creates a static composition
- Lack of contrast: if the subject blends with the background, negative space loses its effectiveness
- Too much emptiness: if negative space dominates at 95%, the subject becomes invisible
💡Negative space transforms emptiness into strength. In landscape photography, it reveals vastness, solitude, contemplation. Dare minimalism: sometimes, less really is more.
✅ Quick Checklist Before Shooting
- What do I want to show, and what can I remove from the frame?
- Where does the eye land first, then where does it go?
- Clean horizon, edges without distracting cut-off elements?
- Did I try a slight move up/down/left/right?
✨ In Short
First, refine your framing to clarify the intention, then compose to give meaning. Take time to observe: a few centimeters of movement can transform the image.